Pipeline Page

OnePageCRM has two types of pipelines:

  • Sales Pipelines help you manage your sales cycle from initial contact to closing,
  • Delivery Pipelines work as a light project management tool for won deals (available only on Business plans).

The Pipeline page holds details about Deals created or imported to the CRM.

Pipeline types

In OnePageCRM, you have the option of 2 types of Pipelines you can create:
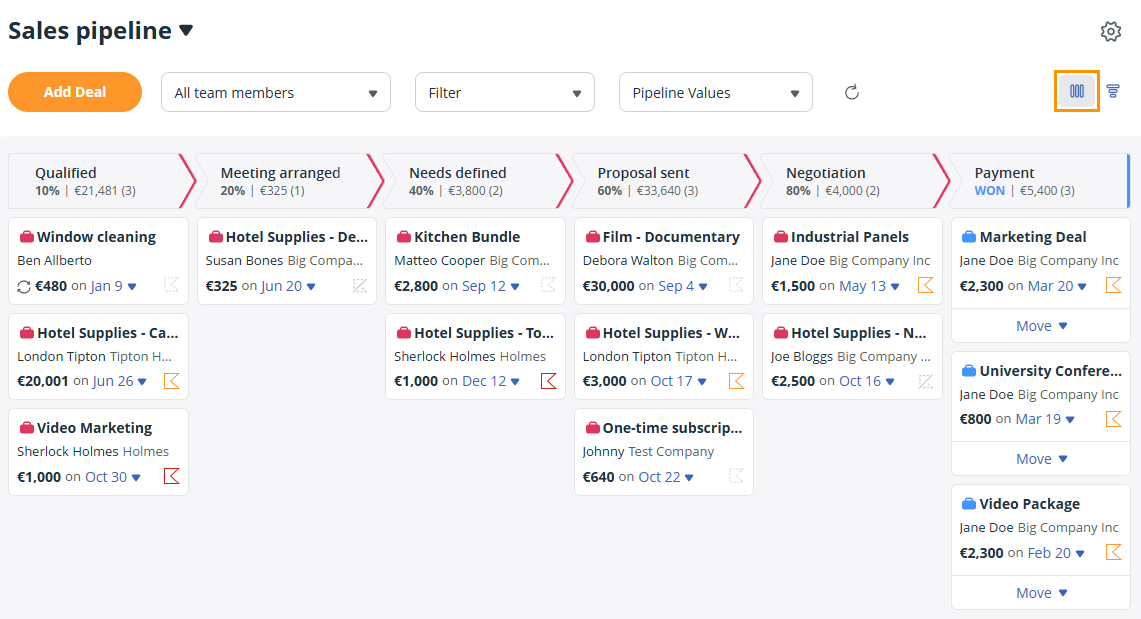
Sales Pipeline

The Sales Pipeline gives you an overview and easy access to any of your Pending and Won deals.
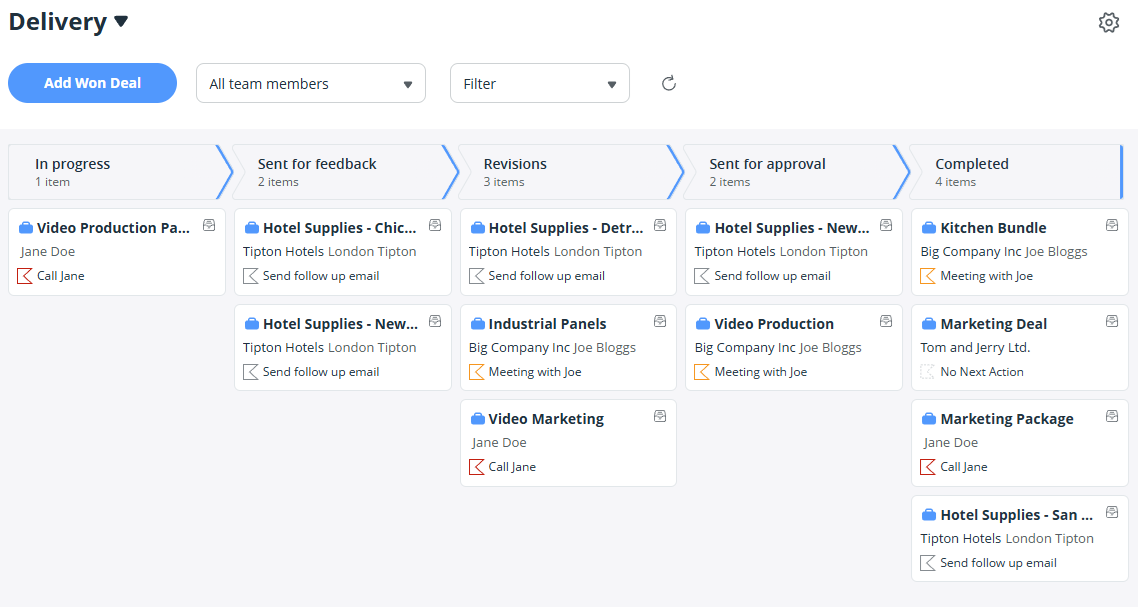
Delivery Pipeline

The Delivery Pipeline allows you to track your deals after they have been marked as Won in the CRM. You can move them then from your Sales Pipeline to the Delivery Pipeline.

Pipeline Views

There are 2 Pipeline Views available for you to choose from.

Kanban View

The Kanban View is available for both Sales and Delivery Pipelines.

It's a simple drag-and-drop interface that provides users with a comprehensive overview of all deals in their CRM system.

In the Kanban view, you can easily move Deals through Deal stages or mark them as Won or Lost in a Sales Pipeline.

You can also review the details of a Deal by clicking on it.

Forecasting View

The Forecast View gives you an overview of your Team's performance against their set targets and predicts your revenue for pending deals

Add/Edit/Remove Deal Stages

Please note: Only the Account Owner and/or Admin can customize Deal stages.

1
To add, edit or remove a deal stage, navigate to your Pipeline Page → click on the Gear icon at the top right-hand side of the page.

Note: You can configure the Deal Stages from the Kanban and Forecast View of the Pipeline Page.

Deal Stages l Gear Icon to configure the pipeline.

2
In the pop-up window, you can edit the Pipeline Name and Stage names as required.

Click on the:
  • blue plus (+) icon - to add a new deal stage → type the probability percentage in the % column and the stage name.
  • red minus (-) icon - to remove a deal stage.
  • click into an existing deal stage name or percentage to edit it.

  • Once you have completed the update → click Save.

    Configure Pipeline pop-up window


    Note: For Delivery Pipelines, you also have the option to choose to Open the associated contact when clicking on a deal card, instead of the deal details, by toggling the slider to green.

    Notes:

    • If you delete a deal stage, existing deals assigned to this stage will be moved to the closest equivalent stage.
    • You have the option to create up to nine deal stages.
    • The Deal Stages will be sorted automatically by the number in the percentage (%) column from lowest to highest.
    • You cannot have duplicate deal stage percentage (%) values - each stage must have a different value.
    • To rearrange the Deal Stages, edit the numbers in the percentage (%) column.
    • A new Deal Stage will always be added at the bottom. However, the stages will rearrange automatically, by the number in the percentage (%) column once saved.
    • You can rename the Won Deal Stage.
    • You can hide the Won Deal Stage in the Configure Pipeline pop-up window by checking the box between the Won Deal Stage name and Hide.

    Multiple Pipelines

    For many sales processes, the Deal Stages are similar, and so these stages are set up on one Pipeline.

    However, if you sell multiple products or services and the sales processes are different, then you may require multiple pipelines with different Deal Stages. Multiple Pipelines are not designed for markets that require different currencies. 

    The Multiple pipelines functionality is available on the Business Plan. Users on the Business Plan can add up to 10 pipelines (in total for Sales and Delivery).

    Add/Edit a Pipeline

    1
    To add another Pipeline, navigate to your Pipeline Page → click on the downward arrow next to the Pipeline name at the top left-hand side of the page → click on + Add Pipeline.

    Pipeline Page | In the top left corner select the downward arrow next to the pipeline name and click +Add pipeline

    2
    In the Add pipeline pop-up, select between a Sales Pipeline and a Delivery Pipeline → click Add to continue.

    Pipeline Page | Add pipeline pop-up window | select between a Sales pipeline and Delivery pipeline | Click on Add

    3
    Type the name of your Pipeline → edit the Stages as required, see details here → click Save.

    Configure Pipeline pop-up window

    Note: You can rename Pipelines by clicking on the gear iconupdate/edit the name → click Save.

    Pipeline Page l Gear icon

    Notes:

    • For the Delivery pipeline, you can choose to open the associated Contact when clicking on a deal card.
    • You cannot select multiple currencies for different Pipelines. Your Account owner/Admin can select the default currency under Localization settings.
    • If you're unsure whether you need more than one pipeline, please email support@onepagecrm.com and our team would be happy to advise you.

    Remove a Pipeline

    1
    Navigate to your Pipeline Page → select the appropriate Pipeline from the downward arrow next to the name at the top of the page → click on the Gear icon.

    Pipeline Page l Gear icon

    2
    In the pop-up window → click Delete Pipeline.

    Remove existing Pipeline.

    3
    You will be requested to select the Pipeline to which you want to move the associated deals. Once selected → click Move and delete.

    Note: Any existing deals will be moved to the closest estimated deal stages.

    Confirm deletion

    Notes:

    • When deleting a Sales Pipeline, you can select another Sales Pipeline to move these deals to.
    • When deleting a Delivery Pipeline, you can select another Delivery or Sales Pipeline to move these deals to.

    View Pipelines

    To view your Pipelines, navigate to your Pipeline Page → click on the downward arrow next to the Pipeline name at the top of the page.

    Note: You can filter the Dashboard by the different Pipelines as well.

    View Pipelines by clicking on the downward arrow next to the Pipeline name.

    Filter your Pipeline

    You can filter your Pipeline by Team Member, deals under different tags or specific saved filters. This can be useful if your company works with different groups of prospects or customers and you wish to segment your pipeline based on these specific groups. 

    To apply a predefined filter to a Pipeline, navigate to your Pipeline Page → select an option from the All Team members dropdown menu or the Filter dropdown menu.

    Pipeline l Predefined Filters

    Notes:

    Pipeline Values

    You can customize your Pipeline View further by selecting Pipeline Values. You can pick between:

    • Pipeline Values
      • Weighted - (More accurate) A deal amount of $1,000 at 50%, is displayed as $500 in the pipeline.
      • Unweighted - (Less accurate) The Deal amount is not displayed as a percentage of its deal stage. The full deal amount is displayed instead.

    Pipeline Values l Weighted & Unweighted

    • How the Deal amount is displayed
      • Deal amount - Displays the amount of the deal from the Amount field.
      • Deal margin - Displays the difference between the selling price of your products or services and the costs of production.
      • Commission - Displays the amount the salesperson would earn.

    Pipeline Values l Deal amount

    Notes:

    • Select an option to sort your Pipeline Page, when it is refreshed:
      • Expected close date - Displays deals from earliest close date to latest.
      • Amount - Displays deals from highest to lowest amount assigned to deal.
      • Days inactive (Business Plan only) - Displays deals from longest inactivity to shortest.

    Pipeline Values l Sort when refreshed

    Deal List

    The Deal List includes all deals created/imported to the CRM, or archived deals. It allows you to filter them or do a quick export.

    If you are using Multiple Pipelines, the Deal list is specific to the selected Sales or Delivery Pipeline.

    Select Headers for the Deal List

    1
    Navigate to your Pipeline Page → scroll down to the Deal List.

    The Deal list can be viewed on both the Kanban and Forecast View.

    Pipeline Page l Deal list

    2
    Click on the gear icon to open the dropdown → select the appropriate headers by checking or unchecking the boxes.
    You can rearrange the headers by dragging and dropping them within the select dropdown menu.

    You can select from the following columns:
  • Commission
  • Created
  • Margin
  • Owner
  • Close Date
  • Deal Custom fields
  • Deal List l Edit

    3
    Click Apply.

    Notes:

    • You can select up to 9 headers to display the deal's details in this list, including Deal Custom Fields.

      By default, it will always display the following:

      • Deal Name
      • associated Contact
      • Amount of the deal
      • The Deal Stage the deal is currently in
    • The Deal List can be sorted by header (ascending/descending), simply click on the header. Clicking on the header a second time will reverse the order for the specific header.

    Filter the Deal list

    1
    Navigate to your Pipeline Page → scroll down to the Deal List.

    The Deal list can be viewed on both the Kanban and Forecast View.

    Pipeline Page l Deal list

    2
    The Deal list can be filtered by the following criteria:
    • Deal Status
      • Pending - All Pending deals currently in a deal stage
      • Won - All Won deals
      • Lost - All Lost deals
      • Closed (Won/Lost) - All Won or Lost deals
      • Won Column - Won deals are displayed in the Won column of the Kanban View.
      • All Deals - All deals saved in the CRM
    • Deal List Headers - ascending and descending
    • Predefined Filters
    • Pipeline Values

    Deal List l Filters

    Notes:

    • To sort the list by the value of a specific header, click on the arrows on the right side of the header.
    • Once the page is reloaded all filters will reset.
    • The headers selected for the Deal List can be accessed from the Forecast View as well.

    Export deals from the Deal list

    1
    Navigate to your Pipeline Page → scroll down to the Deal List.

    The Deal list can be viewed on both the Kanban and Forecast View.

    Pipeline Page l Deal list

    2
    Select the appropriate filters for the Deal List → click on the downward arrow → select CSV or Excel to start the download.

    Deal List l Quick Export

    Note: The download will only include the Deals that match the applied filter and details from the displayed headers. If you are looking to export all deals and all the deal fields, perform an export from the Import and Export page.

    Did this answer your question? Thanks for the feedback There was a problem submitting your feedback. Please try again later.

    Still need help? Contact Us Contact Us